How to Use Framer Workshop AI: A Complete Guide
Discover how Framer Workshop AI turns simple prompts into powerful interactive components, from sliders and calculators to quizzes and custom UI effects.

Framer Workshop is quietly one of the most powerful tools inside Framer - and one of the most underused. Most people open it once, generate a hover card, and forget it exists. In reality, Framer Workshop can build sliders, calculators, quizzes, galleries, and full interactive UI components from a single written prompt. This guide walks through exactly how it works, how to prompt it well, and how to avoid the mistakes that waste most people's first few attempts.
Quick tips before you start:
Start with one clear idea, not five features at once.
Always describe the interaction, not just the look.
Treat every generation as a first draft - refine, don't restart.
1. Introduction to Framer Workshop AI
Framer Workshop is an AI-powered plugin built directly into Framer that turns written descriptions into working, code-based components. Instead of designing an interaction manually or hiring a developer to build custom functionality, you describe what you want in plain language, and Workshop generates a fully functional component - complete with editable property controls - right inside your project.
💡 Want to skip the blank canvas? Explore collection of Framer Templates to find ready-to-use designs you can customize and build on with Framer Workshop.
It's useful because it closes the gap between "I have an idea for an interaction" and "I have a working component I can drop into my site." Designers get advanced functionality without writing code. Developers get a fast first draft they can refine further. Either way, Workshop removes a huge chunk of manual build time.
2. How Framer Workshop Works
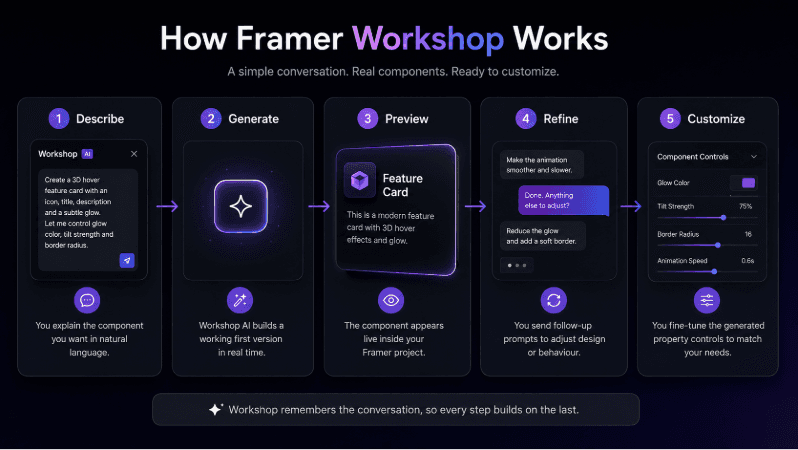
At its core, Workshop runs on a conversational workflow:
Step | What Happens |
1. Describe | You explain the component you want in natural language |
2. Generate | Workshop builds a working first version in real time |
3. Preview | The component appears live inside your Framer project |
4. Refine | You send follow-up prompts to adjust design or behaviour |
5. Customize | You fine-tune the generated property controls |
Because Workshop remembers the conversation, you don't need to restart from scratch every time something is slightly off. You just tell it what to change next.
3. How to Access Workshop
Workshop lives inside Framer itself - no external tools or accounts needed. You'll find it in two main places:
Plugins panel - search for "Workshop" and open it directly inside your project
Quick Actions / Actions menu - accessible from anywhere in the editor for a faster shortcut
Once open, Workshop presents a chat-style interface where you type your first prompt and watch the component generate inside your canvas.
💡 Tip: Workshop sits next to smaller utility plugins in the UI (icon pickers, font testers), which is why a lot of users underestimate it. It's not a small utility - it's a full code-generation environment.
4. How to Write Better Prompts
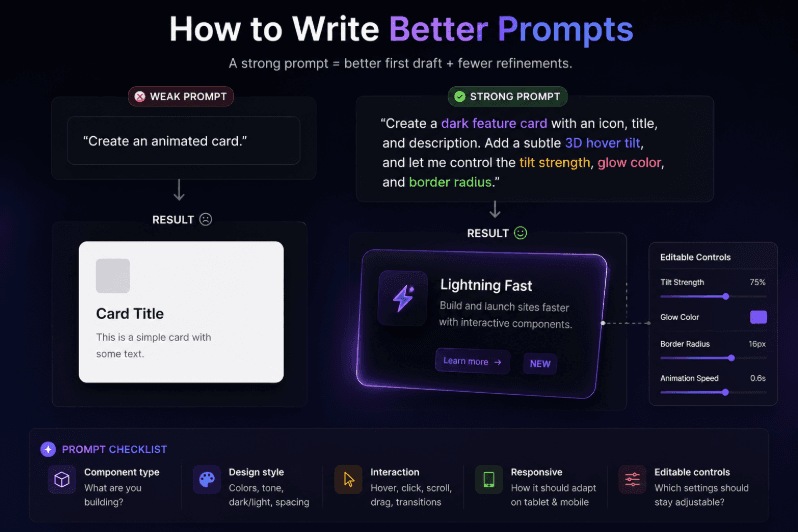
A strong Workshop prompt does more than describe what something looks like - it describes what it does. Aim to include these five elements:
Element | What to Include |
Component type | What are you building (card, slider, calculator, form)? |
Design style | Colours, tone, dark/light mode, spacing |
Interaction | Hover, click, scroll, drag, tilt, transition |
Responsive behaviour | How it should adapt on tablet and mobile |
Editable controls | Which settings should stay adjustable afterward |
Weak prompt: "Create an animated card."
Strong prompt: "Create a dark feature card with an icon, title, and description. Add a subtle 3D hover tilt, and let me control the tilt strength, glow colour, and border radius."
The second version gives Workshop everything it needs to generate something usable on the first try, instead of five rounds of guessing.
5. Create Your First AI Component
A simple, low-risk way to try Workshop is building an animated feature card or a hover effect. Here's the basic flow:
Open Workshop from the Plugins panel.
Prompt: "Create a feature card with an icon, title, and short description. Add a smooth hover lift with a shadow increase."
Let Workshop generate the first version and preview it live.
Check how it behaves on hover directly in the canvas.
Adjust the exposed property controls (colour, spacing, shadow strength) to match your site.
This gives you a feel for the conversational workflow before jumping into anything more complex, like calculators or multi-step forms.
6. Refine Generated Components
You rarely need to regenerate a component from zero when only one detail is off. Instead, send focused follow-up instructions:
"Make the animation slower."
"Keep the design but reduce the glow."
"Add a control for animation speed."
"Make the component responsive."
"Keep desktop unchanged and improve mobile."
"Remove this effect without changing the layout."
Workshop supports iterative refinement through the same chat thread, so each instruction builds on the last version instead of starting over.
💡 Tip: If you've sent more than three back-and-forth refinement messages and it's still off, it's often faster to write one new, more detailed prompt than to keep patching the same generation.
7. Best Components to Build With Workshop
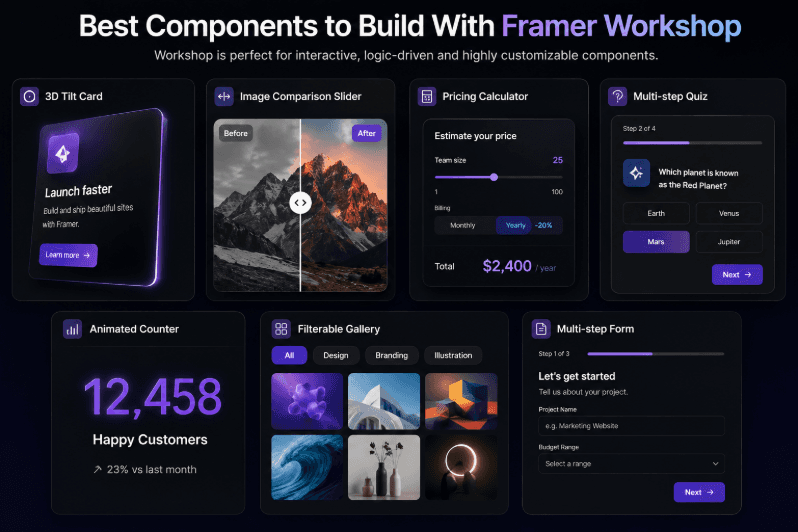
Workshop is best suited to components that would otherwise require custom code. Some of the strongest use cases include:
Category | Examples |
Interactive cards | 3D tilt cards, hover-reveal cards, flip cards |
Sliders & galleries | Image sliders, comparison sliders, filterable galleries |
Calculators | Pricing calculators, ROI calculators, quote estimators |
Counters & data UI | Animated counters, progress bars, stat displays |
Forms & quizzes | Multi-step forms, interactive quizzes, region-based banners |
Cursor & visual effects | Custom cursors, WebGL gradients, magnetic buttons |
If it involves logic, state, or a custom interaction beyond a simple transition, it's a good candidate for Workshop rather than manual design.
8. Workshop Prompt Examples
Copy, tweak, and test these directly inside Workshop:
"Create a pricing calculator with a slider for team size and a toggle for monthly/yearly billing. Show the total price update live."
"Build an image comparison slider with a draggable divider between a before and after image."
"Create a 3-step onboarding quiz with progress indicator and a summary result screen."
"Design an animated stat counter that counts up when it scrolls into view, with editable duration and colour."
"Create a region-specific cookie banner that shows different text for EU and non-EU visitors, with an accept/decline togglsse."
9. Workshop vs Regular Framer Components
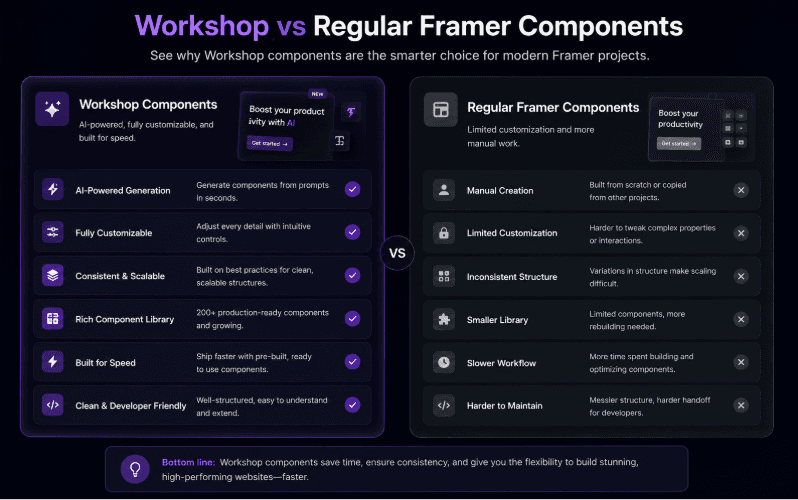
Regular Framer Components | Workshop-Generated Components | |
Best for | Standard layouts, static UI, simple interactions | Logic-heavy, custom, or advanced interactions |
Skill needed | Manual design + Framer's built-in tools | Written prompt, no coding required |
Speed | Slower for complex logic | Fast first draft in minutes |
Customization | Manual property setup | Auto-generated property controls |
When to use | When Framer's native tools already cover it | When you'd otherwise need a developer |
The short version: use Framer's regular design tools when the built-in components already do the job. Reach for Workshop when you need custom functionality - a calculator, a quiz, a data-driven interaction - that would normally require actual code.
10. Best Practices
Start simple. Get a basic version working before adding every feature you want.
Refine step-by-step. Small follow-up prompts produce better results than one giant request.
Test responsiveness early. Check tablet and mobile before you consider the component finished.
Keep components consistent. Match colours, spacing, and type to your existing design system so generated components don't look bolted on.
Reuse property controls. Once a component has good controls exposed, duplicate and restyle it instead of generating from scratch each time.
11. Common Mistakes
Vague prompts. "Make it cool" gives Workshop nothing to work with - describe the interaction specifically.
Too many requirements at once. Asking for five features in one prompt usually produces a worse result than building them one at a time.
Ignoring mobile. A component that looks great on desktop can break completely on smaller screens if you don't test it.
Not testing the interaction. Always click, hover, scroll, and drag the generated component yourself - don't just judge it by how it looks in the preview.
Expecting perfection on the first try. Workshop's first output is a starting point, not a final answer - plan to refine it.
💡 Tip: Workshop remembers your previous conversation, so reuse and build on earlier prompts instead of describing the same component from scratch every time you want a variation.
12. Conclusion
Framer Workshop turns "I want this interaction" into a working, editable component in a fraction of the time manual development would take. It's most valuable when Framer's standard design tools aren't enough - when you need custom logic, advanced interactivity, or a reusable component without writing implementation code yourself.
Used well, Framer Workshop doesn't replace design thinking - it removes the technical bottleneck between your idea and a working result.


